
 Justin Gardner – Preserving food is an essential skill of the homesteading lifestyle. Whether you grow the food yourself or purchase it in bulk at farmers markets, some kind of preservation is needed so you can have certain fruits and vegetables later in the year.
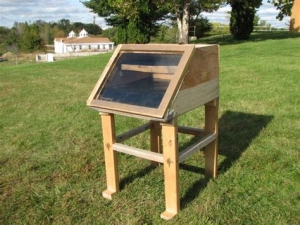
While canning, pickling and freezing work well, adding dehydration to the mix gives you even more diversity. Instead of spending lots of money on a fancy machine, you can make a solar food dehydrator for much less, and take pride in your DIY project.
Dennis Scanlin of the Appropriate Technology Program at Appalachian State University spent nearly 20 years testing and experimenting solar dehydrator designs. His solar dehydration unit can dry large amounts of food quickly, and is wheeled for easy movement. Plus, you can add light bulbs to improve operation when the weather is cloudy or humid.
With a few tools and basic woodworking skills, this solar food dehydrator can become a vital part of your homestead.
This design relies on indirect solar power, meaning the drying food is not exposed to the sun but instead to solar-heated air. Our dryer takes advantage of the natural process of rising hot air to operate efficiently without any electric fans.
The drying chamber of this dehydrator supports 11 trays to hold up to 10 pounds of thinly sliced food — about 35 to 40 medium-sized apples, for reference. It can dry this amount of food in two sunny days, or about half this amount of food in one sunny day because of better ventilation and reduced food mass. The temperature inside the chamber can easily soar to more than 140 degrees Fahrenheit.
Visit here for detailed instructions on building and using Scanlin’s solar food dehydrator.

Materials List
♦ One 4-by-8-foot sheet of 3/4-inch plywood, exterior grade
♦ One 4-by-8-foot sheet of 1/4-inch plywood, exterior grade
♦ Five 1-by-6s, 8 feet long, pressure-treated
♦ Two 2-by-4s, 8 feet long, pressure-treated
♦ 2 wheels, 8-inch-diameter
♦ 36-inch-long, 1/2-inch-diameter steel axle
♦ 2 heavy-duty hinges
♦ Six 27-by-96-inch sheets of metal lath
♦ 3 square feet aluminum screen
♦ One 2-by-6-foot sheet of FRP (fiber-reinforced plastic)
♦ 30 square feet food-grade screening
♦ Heavy-duty aluminum foil, 25-foot roll
♦ 3/4-by-1/8-inch aluminum battens, 16 feet total length
♦ 1 1/4-inch No.8 exterior-grade Phillips flat-head screws (100 or more)
♦ 1 5/8-inch No. 8 exterior-grade Phillips flat-head screws (about 30)
♦ 1-inch No. 8 round-head screws (about 20)
♦ Eight 3/8-by-3-inch bolts, nuts and washers
♦ Four 3/8-by-4-inch bolts, nuts and washers
♦ 4 hook-and-eye fasteners
♦ 1/4-inch staples
♦ Exterior-grade latex paint and primer, any light color
♦ High-temperature spray paint, black
♦ Waterproof glue
♦ Silicone caulk
♦ Weatherstripping
♦ Shingles
Tools List
♦ Circular saw with rip guide
♦ Router with 3/4-inch straight bit and cutting guide
♦ Electric drill with No. 8 pilot-hole and countersinking bits
♦ 2 sawhorses
♦ Long straightedge
♦ Marking pencil
♦ Protractor
♦ Framing square
♦ Level
♦ Tape measure
♦ Staple gun
♦ Caulk gun
♦ Paintbrush
♦ Wrenches
♦ Tinsnips
♦ Utility knife
♦ Clamps
♦ Heavy work gloves
Justin Gardner writes for TheFreeThoughtProject.com
SF Source Activist Post Feb 2016
I am building a solar dehydrator, using your design as an guide. Where do u get bulk tray screening? Thnx, Bob
Hi Bob, you’ll have to ask the writer of the article Justin Gardner. The article was originally published on http://thefreethoughtproject.com/ in 2016. Alternatively you may want to use a search engine to research where to find bulk tray screening. -g
Nice one! We featured Dennis’s solar food dehydrator in our HomemadeTools.net newsletter, fully credited and linked to this page. Here it is:
http://mailchi.mp/buildthreads/rotary-mower-belt-sander-bench-block-enhancements
I hope we bring you lots of traffic. Cheers 🙂
thanks for this post!