
Anyone who deals with the constant leakage of water from the cistern, constant filling of the tank or unexpected flooding of the floor knows what it’s like to suffer through the inconvenience of a leaking toilet. Fortunately, these situations are effectively prevented via self-repair.
Determining what type of leak
 Depending on the cause of the leak, the fault may have various consequences. For example, a cistern failure causes continuous flow and filling of the tank resulting in significant water loss and high fees.
Leakage directly from the connection to the sewage system may result in the appearance of unsightly deposits on the tiles and a decrease in the level of safety.
A slippery floor is one of the most common accident factors in bathroom space. A high level of humidity also affects the development of bacterial habitats and dangerous microorganisms.
Do not underestimate the issue of toilet failure. Read up on solutions in the guide on how to fix a running toilet without a ball float. Or if you’re looking for ways to unclog a toilet without a plunger, this guide will also help you.
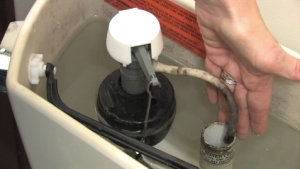
Cause #1: damage to the float
An undamaged float is crucial to controlling water inflow to the tank. The displacement element floats on the surface of the water and, depending on its level, acts through the arm on the adjusting screw.
First, carefully remove the tank lid. Check for defects by moving the element on the lever or immersing it. If you notice the lever is improperly adjusted use “trial and error” until the float setting is correctly adjusted. If the lever and/or float is broken you’ll have to replace with a new one. Fortunately, the repair task is simple and the cost low.
How to repair
♦ Close the water inflow valve to the tank
♦ Flush to empty the water tank
♦ Unscrew the fastening screws and remove the damaged element
♦ Install the new unit using the set of screws attached to the packaging.
♦ Set the float in a position that guarantees correct response to changes in the water level of the tank.
Verify correct positioning by re-opening the water supply to the tank. When setting float position, make sure it stops water pouring in at the level set by the new unit.
If the flushing button is damaged unscrew from the valve body and and replace with new part. Properly placed, it lifts as the tank fills.
Cause #2: damage to the gaskets or flush valve
If you do not notice any abnormalities by inspecting the float, the causes of the fault should be sought deeper. A frequent reason for leakage is a non-functioning flushing mechanism. So, fix this as follows:
♦ Close the water inflow valve
♦ Empty the water tank
♦ Close the water inflow valve
♦ Empty the water tank and check to see if the inlet valve gasket (on lever) and/or the gasket at the drain opening are damaged. If damaged, replace with new parts from the original manufacturer.
Cause #3: pollution inside the tank
As a result of prolonged use, impurities can appear in the toilet tanks, which negatively affect the functioning of the flushing mechanism. They usually take the form of an annoying stone or sludge located directly in estuaries.
To get rid of them, empty the tank and then gently remove the flushing valve. Other activities will require burdensome stone deposits. A good solution is to soak them in vinegar for about an hour. It will soften the sludge and allow you to get rid of it without having to scrub the inside of the tank.
Shift Frequency © 2019 – How to Repair a Leaky Toilet