
Best Stainless Steel Cookware Sets 2017
 Before you buy your set and end up disappointed, let’s clear something up. Twelve piece set doesn’t mean twelve pots and pans with their lids. It means, for example, eight pots and pans and four lids. So, the number of pieces is the sum of lids, pans, and pots.
When end of the current lifestyle you’re living as you know it (as opposed to the end of the world as we know it) comes, you’re going to want to know how to cook food by more readily-available means. A drastic lifestyle change, temporary or otherwise, caused by something as unfortunate as an unexpected natural disaster striking your area (like an earthquake, flood, or string of tornadoes) or as simple as a planned outdoor trip for the upcoming weekend, leads to a serious change in available resources.
While, naturally, fire would be the first option most would turn to, there are ways to get a tasty, home-cooked meal without the smoke. In this situation, the sun is your best friend. There are a quite a few ways to cook with the sun, but they all revolve around the same principles: reflecting, concentrating and directing the sun’s UV rays at the food you want to cook.
We will look at how to assemble our own effective means of doing this through a homemade reflective cooker, which both serves its purpose well and is affordable. A trip to the store may not even be necessary; many of the materials needed to construct one of these from scratch can be found in your home. Before beginning to put a cooker together, gather those materials! Make sure you have all the parts needed to completely build one. You really don’t want to find yourself out in the sun with nothing but a tin foil box:
- Aluminum foil (heavy duty, if you have it)
- Heavy duty cardboard or 1/4 inch plywood
- Tape. Duct tape works best, but masking or even electrician’s tape will work. It needs to be able to hold your cooker together while in use and keep the foil in place
- *Glue (*not necessary, but helpful)
- Black cookware (if you don’t have this, you can paint your aluminum, enamel or stainless steel cookware black)
- An oven bag to create your “oven” – the enclosed space that will become heated.
- A rack of some kind to elevate your cookware and allow air to circulate freely in the “oven” (this allows for even cooking).
- An oven thermometer, if you have one.
Once all the materials have been collected, you’re ready to put your reflective cooker together. Whether building for a short-term experiment (cardboard is lighter and often more readily available) or to serve as a more permanent resource (plywood is sturdier and more durable), the basics for constructing it are still the same. For an idea of what the final product will look like, imagine a cardboard box. Remove the top and one of the sides, then reinforce the seams and corners with tape.
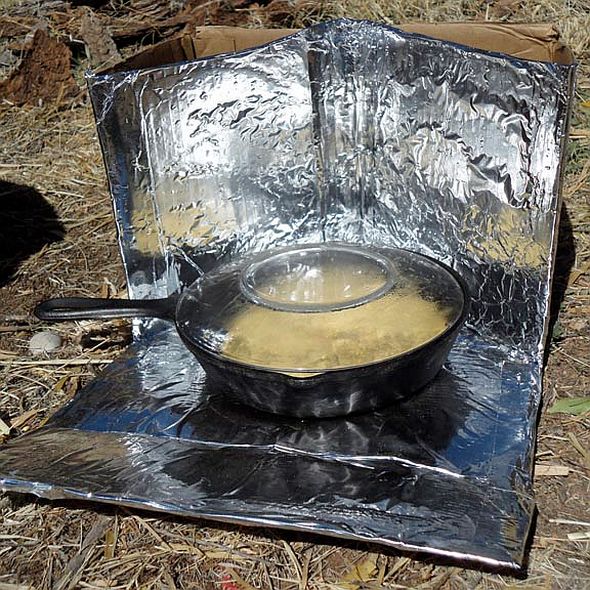
Regardless of whether or not your solar reflective cooker actually started out in box form, that’s basically what it will resemble: a cut-up box. Take a quick peek at the picture below for an idea of what it’ll look like, plus one more side. Nearly the same idea, this closely resembles what the heating (or reflecting) chamber of your solar cooker will end up looking like. Notice the angle of the side walls; this allows a higher percentage of UV rays to be concentrated onto the food. After forming the “reflecting chamber,” cover the inside walls and the bottom with aluminum foil shiny-side out.
It does help to have some sort of glue handy to keep the foil in place on the cardboard or plywood base; however, tape can be used just the same. Just tape the foil into place along the back side of the chamber. (Note: keep tape out of the reflective chamber! Tape or any other dull surface inside of your cooker reduces the amount of UV rays reflected onto your food. You want as much foil as possible showing to keep those rays reflecting and your food cooking.) Slightly bowing out the front sides creates a broader, better ray-capturing angle and will increase the heating capabilities of the cooker.
Next, take your oven bag, put your wire rack inside, and then set both on the reflective base. An oven roasting rack or old grill grate will work nicely. Place your black cookware or pot on top of the rack inside the bag (if you are planning on using an oven thermometer, insert it into the bag as well). Then, close the bag and tie it off with a twist-tie, rubber band, or zip tie.
That’s it! You’re done. Within about an hour, if your reflective cooker is facing the sun and it’s not too overcast, your cooker should be able to reach 350° Fahrenheit: sufficient to cook just about anything you want. It’s important to remember, as you’re relying on the UV rays’ energy to reflect onto your food and cook it, that the cooker will need to be moved every twenty to thirty minutes to keep the angle at which they strike favorable. Whether disaster prep or a fascinating project, your homemade reflective cooker serves its purpose well. Good luck and even better cooking!
Ben Tanner is the editor for www.FoodStoreHouse.com and is a prepper who loves to write about self reliance and survival skills. He loves living the prepper lifesyle and is currently working on converting his home off the grid. You can also follow Ben on Facebook and Twitter.
SF Source ReadyNutrition August 8 2014